
Here's some process pics:

Right after pouring on the mixture and smoothing it out and along the sides with a plastic spoon

Yep, a little drippy and messy... had to keep smoothing the drips away with my "spoon" every 5 minutes or so till it was thick enough to stop running.

Here's the finished product: SHINY! :) (not to mention heat and alcohol resistant and waterproof! :))
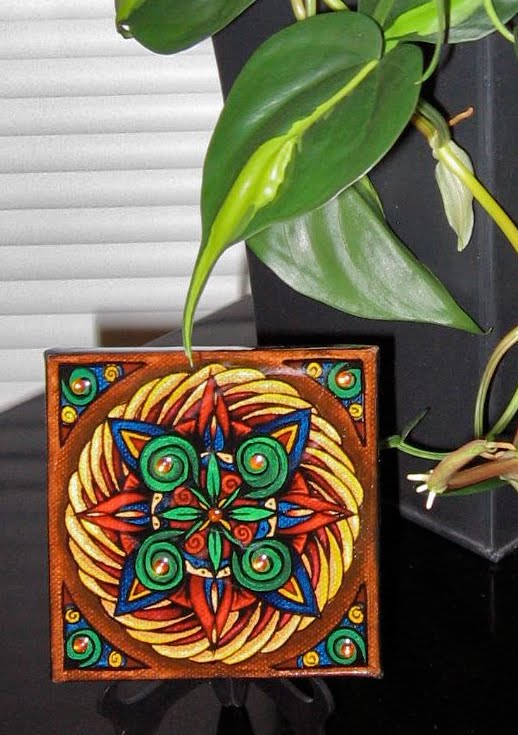

Just thought I'd mention, the original piece was done in acrylic ink and sealed with a fixative in case the ink ran... wasn't sure how it would react to the liquid resin... thought it was best to be on the safe side. Also worth a mention, the resin took a little over 12 hrs to dry completely (not sticky). Well worth the time and effort in my opinion!
So that's that! This experiment was a success and I love the results! I will most definitely be using it in the future for other projects! :)
If anyone has any other recommendations or experience with similar resin products, I would love to hear! :)
Happy creating guys!
Beautiful!! I really have to try resin. Have you ever watched Wyanne's you tube videos? She seals all of her pieces in resin and after she applies the resin, she uses a small hand torch to get rid of the air bubbles. I know that you can get alot of bubbles, or not--I don't know--I've never tried it--but I will!
ReplyDeleteThanks Diane! I haven't seen Wyanne's videos but I will definitely check them out now! I should have watched them in the first place, she is one the artists who inspired me to try this. I love her work! :) I had a lot of air bubbles as well but didn't have a torch, blowing lightly on the surface did the trick though, I'm glad it was a small piece! :D
ReplyDeletesweet! I'm glad you tried this out cause I've been wondering about doing the same thing with my photographs. I have a couple pieces I got from another photographer and they look stunning & so professional when they're sealed like that. I'll definitely have to chat more with you about it!
ReplyDeleteI love using resin Cindy, and I do use a little blowtorch to remove the bubbles. I have only used it on brooches but would love to try it on a canvas. What brand have you used here?
ReplyDeleteIt looks great.
Lee:)
Hi Lee, I didn't think to mention the brand, it's "EnviroTex Lite". I would love to see some of your brooches!
ReplyDeleteK8, I totally agree, it definitely adds a beautiful finishing touch. I love it and I think it would be perfect for your photographs :)
Its great that you wrote about this. It is a technique that I saw a lot of in Quebec galleries. I wondered about how to do it and what to use a long time before I actually tried it, so it's nice to see that someone else has had the same questions and expirimented with it!
ReplyDelete